Driving with a burned out taillight bulb can be very dangerous and expensive. You could get a ticket, or worse yet, get rear ended! Most of the time, we don’t know a taillight is burnt out unless someone tells us. I mean really, how often do you walk around the back of your car while your foot is on the brake? Taillights are quick and easy to change, so go ahead and do it yourself instead of taking your car to the auto shop!
What you will need:
![]() Screwdriver (not the orange juice kind)
Screwdriver (not the orange juice kind)
![]() New bulb
New bulb
![]() Gloves
Gloves
![]() A friend or really smart dog who can reach the brake pedal
A friend or really smart dog who can reach the brake pedal
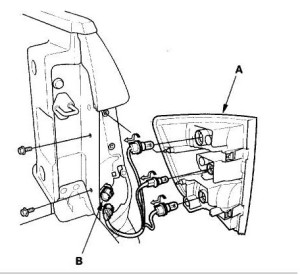
 To access the burnt out bulb, remove the trim and covering behind the taillight itself. That will give you access to the back of the bulb or access to the lens housing so the lens (the red plastic that covers the bulb) can be removed from the body of the car.
Important: Bulbs are sensitive and can be contaminated if you simply
touch the bulb. That’s why you need the gloves.
Follow these simple instructions:
-
Open the trunk.
-
Find the access panel to the lights. Don’t be alarmed if you don’t see it right away. Sometimes the panel is well hidden, but it is always in the trunk somewhere. Look under the carpet and in the corners. If you still don’t see it, check your owner’s manual for the location of the rear/tail light panel.
-
Note of encouragement: Accessing the assembly is the most difficult part of this task! Now that you know where to find it, this will be much simpler next time!
-
Once you have found the access panel, you will see a small knob on the back that you can twist by hand. It will remove the back side of the taillight where you can access all of the bulbs.
-
Identify the bulb that needs to be replaced by asking your friend/dog to turn on the ignition and press the brake pedal. Turn the car off again.
-
Twist and pull the socket so you can remove the old bulb.
-
Remove the old bulb. For most cars, you just pull out the bulb, but in some cars you have to twist and pull the bulb.
-
Check the electrical contact where the bulb connects in the socket to make sure it’s not burnt.
-
Insert the new bulb.
-
Twist the socket back in to the assembly.
-
Pop the assembly back into the body and secure the panel closed.
-
Test the lights by asking your friend to turn on the car and press on the brake again. Make sure all the lights are working.
-
If you see someone driving with a burnt out tail light, let them know. And tell them how you learned how to do it yourself at WAK!
-
Now go tell all your friends that you rock!
Headlights are almost as easy to change. Keep posted for more DIY fixes for your car. Not only will we show you exactly what to do, we’ll also let you know when you might want to call in some professional help!
Mechanically Yours
Audra
nice blog i love it 🙂
Thanks for checking us out! For more safety tips, check out http://www.womenautoknow.com and become a free member today!